How to Make a Wreath in 5 Minutes
Have you ever seen a wreath you wanted and thought to yourself, “I could make that”? But, then when push came to shove you chickened out OR you really did make it and it was a let down?
I can show you a few tricks to ensure you get a full, perfecty shaped wreath in just five minutes flat!
The first wreath I ever made was from my parents’ grapevines. I was about twelve and knew exactly what I wanted it to look like. I dried the flowers and shaped the wreath out in the garage.
I bought some of that crinkled paper ribbon that you have to untwist- do you remember that stuff??? It was mauve because mauve and country blue were all the rage back then. Oh, and my glue gun was mauve, too. So color coordinated!
Anyway, I labored over that 3 foot wide (!) wreath for hours and when I held it up- it. was. stunning! I’m not sure how I did it at the age, really. But, people started asking me to make them for them after that.
My sister-in-law even asked for one as their wedding gift. It was a very proud moment for a twelve year old!
Over the years I have tried several different methods for wreath making and there are three things that seem to work the best- not to mention the fastest. So, let’s get started. . .

How to Make a Wreath in 5 Minutes
*This post contains affiliate links to products I know &/or love.
Supplies
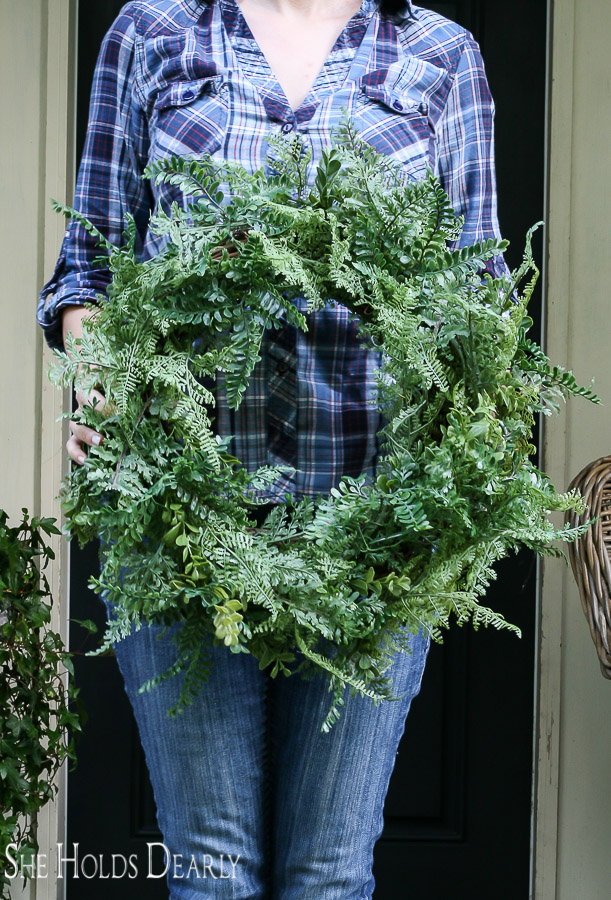
- Start with a grapevine wreath or a similar vine wreath as your form, not a wire one and not a floral foam one.
- You need it to have the right shape, not fall apart easily and not look fake if it shows through your foliage.
- I’m using a 15 inch one in this tutorial.
- Then, choose your foliage as a garland if you can.
- I am using two 6 ft fern garlands here.
- Finally, gather some floral wire and wire cutters.
- Optional- Command Strips for hanging.

Tutorial
- Wire down the end of your garland on the outside edge.
- Cut a few 8-10 inch strips of wire.
- Start coiling the garland around the outside once, then up on the face of the wreath and down around inside. Watch the video below, if I just totally confused you.
- Tuck in the two ends of the garlands as you add in the second one.
- Wire everything into place, alternately you can wire the garland into place as you coil.
- Hold up your wreath and fluff up the foliage, hiding the wire and main plastic vine of the garlands.
- Now go hang your creation somewhere obvious for a fabulous focal point!
Watch this video to see how easy it is!
As much as I love gardening, when it comes to my house I have made peace with having faux plants. This faux fern wreath will last me for the many years and will easily work for spring, summer and fall decorating!

Shop this look
[show_shopthepost_widget id=”3153429″]

My white porch curtains make this picture look cropped funny!


Pin for Later

Related Posts:
How to Milk Paint a Metal Door


